
We’re updating our Knowledge Base
We’re currently transitioning Ardens Clinical support articles to this new Knowledge Base. Content will be added progressively, so you may find limited articles available at this stage.
In the meantime, you can access our full support resources on our existing sites:
We’ll continue to expand this site, so please check back regularly.
ℹ️ Introduction
Ardens provides protocols to support the delivery and recording of seasonal vaccinations. This article explains how to create a local copy of the relevant protocol and update it for use within your practice.
Background
Ardens seasonal vaccination protocols support clinicians with the accurate recording of vaccinations within the clinical system. In EMIS Web, practices need to create a local copy of the relevant protocol and update it with details of the vaccine stock currently being administered before it can be used by practice staff.
The sections below provide guidance on updating each seasonal vaccination protocol.
💉COVID-19
There are four available COVID-19 protocols to support GP practices with each vaccination type. The protocols are available on the Ardens Portal. This video provides full guidance on how to download and use them.
Download files from the portal
Login to the Ardens Portal
Select your organisation
Scroll down to the Manual Search Download/Update section and click the Protocols filter
Select the DOWNLOAD button next to the protocol
⚠️ Please note: you will need to download each protocol individually
This will normally download the file to your Download folder in File Explorer
Repeat these steps for each COVID-19 protocol
Import the files to your EMIS system
Once downloaded, access the Resource Publisher module within EMIS Web
Select a suitable folder in your practice area
Click the Import button on the EMIS ribbon and select the protocol from your Downloads folder or the location you saved the files to
Click Open
This will import the file to your chosen location
1st Dose Required - Edit Protocol
Right-click on the protocol and select Protocol > Edit
Use the scroll bar at the bottom of the screen to scroll right until you see the "EDIT BATCH NUMBER/EXPIRY DATE" box
Below the EDIT BATCH NUMBER/EXPIRY DATE box, there is a multiple-choice question box, together with associated Add Coded Data boxes. Double-click on the multiple-choice box

Select the first option and click Edit
Replace the XX placeholders for the batch number (BN) and expiry date (exp) with the details of your practice's vaccine stock.
Click OK
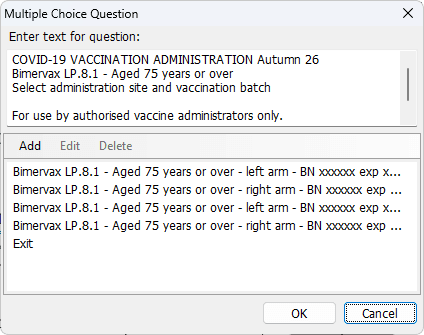
Next, double-click on the associated Add Coded Data box.
Complete the Batch Number and Expiry Date fields
Select OK
Repeat this for each Add Coded Data box associated with the multiple-choice box

⚠️Important: The qualifiers MUST be completed for the vaccination data to be saved back to the patient record.
Once complete, click Save and Close
Press Yes to any warning messages
Right-click on the protocol, select Status > Activate
⚠️Please note: Repeat these steps for each COVID-19 protocol vaccine type required
Care Home Patients - Copy & Edit Protocol
Once you have edited the protocol using the steps above, the protocols need to be further copied and edited for Care Home patients, if required in practice. This is due to further qualifiers that need to be amended.
Right click on the required protocol edited for 1st dose patients and click Copy
Right-click on an appropriate folder and select Paste
Once pasted, right-click on the protocol and select Protocol > Edit
Use the scroll bar at the bottom of the screen to scroll across to the following multiple choice question box (highlighted below)

Double-click on the multiple-choice question box
For each option, click Edit and replace the existing details with the name of your care home, batch number, and expiry date. Please note that you can include up to two care homes. If you need to add further care homes, we recommend copying another protocol.

Click OK once complete
Scroll to the next multiple choice question boxes (highlighted below)

Replace the first multiple-choice question box with the details of the first care home. If required, use the second box to add the details of the second care home.
Click OK once complete

Next, double-click on the associated Add Coded Data box
Complete the Batch Number and Expiry Date fields
Click on the Eligibility drop down field and change to Resident in a care home for older adults
Click on the Location drop down field and change to Care Home
Add the ODS code
Select OK
Repeat this for each Add Coded Data box associated with the multiple-choice box

⚠️Important: The Add Coded Data boxes MUST be completed for the vaccination data to be saved back to the patient record.
Once complete, click Save and Close
Press Yes to any warning messages
Right-click on the protocol, select Properties. Rename the protocol to clearly indicate that it is to be used for care home patients
Right-click on the protocol, select Status > Activate
⚠️Please note: Repeat these steps for each COVID-19 protocol vaccine type required.
Housebound Patients - Copy & Edit Protocol
If required, the protocols will need to be copied again for housebound patients, as additional qualifiers will need to be amended.
Right-click on the required protocol edited for 1st dose patients and click Copy
Right-click on an appropriate folder and select Paste
Once pasted, right-click on the protocol and select Protocol > Edit
Use the scroll bar at the bottom of the screen to scroll right until you see the "EDIT BATCH NUMBER/EXPIRY DATE" box
Below the EDIT BATCH NUMBER/EXPIRY DATE box, there is a multiple-choice question box, together with associated Add Coded Data boxes. Double-click on the multiple-choice box
Select the first option and click Edit
Replace the XX placeholders for the batch number (BN) and expiry date (exp) with the details of your practice's vaccine stock.
Next, double-click on the associated Add Coded Data box.
Complete the Batch Number and Expiry Date fields
Click on the Location drop down field and change to Home of housebound patient
Select OK
Repeat this for each Add Coded Data box associated with the multiple-choice box

⚠️Important: The Add Coded Data boxes MUST be completed for the vaccination data to be saved back to the patient record.
Once complete, click Save and Close
Press Yes to any warning messages
Right-click on the protocol, select Properties. Rename the protocol to clearly indicate that it is to be used for housebound patients
Right-click on the protocol, select Status > Activate
⚠️Please note: Repeat these steps for each COVID-19 protocol vaccine type required.
2nd Dose Required - Copy & Edit Protocol
Right-click on the required protocol edited for 1st dose patients and click Copy
Right-click on an appropriate folder and select Paste
Once pasted, right-click on the protocol and select Protocol > Edit
Use the scroll bar at the bottom of the screen to scroll right until you see the "EDIT BATCH NUMBER/EXPIRY DATE" box
For each Add Coded Data box, change the Vaccination Sequence to 2
Select OK

Once complete, click Save and Close
Press Yes to any warning messages
Right-click on the protocol, select Properties. Rename the protocol to clearly indicate that it is to be used for patients requiring a 2nd dose
Right-click on the protocol, select Status > Activate
Add to your F12 key
Each required user will need to add the protocols to their F12 key in order to use for clinics.
Press F12 on your keyboard
Right-click on an available letter or number and select Add
Search for the COVID-19 protocol and double-click or click OK to add
💉RSV
The RSV protocol needs to be copied into a practice folder and updated with details of the vaccines currently being administered by the practice.
Create a Local Copy
Access the Resource Publisher module
Select Shared Folders
Select Ardens Live National Content > Vaccinations protocols > RSV Vaccination
Right-click on the "RSV vaccination administration" protocol and select Copy
Navigate to an appropriate practice folder
Right-click the folder and select Paste
We recommend renaming the protocol once it has been copied. Right-click on the copied protocol and select Properties
Enter a name for the protocol, for example, by adding your practice initials to the beginning of the title
Select Save
⚠️Please note: once pasted, the protocol may not appear immediately, and you may need to click Refresh on the EMIS ribbon and log out and back in to the system.
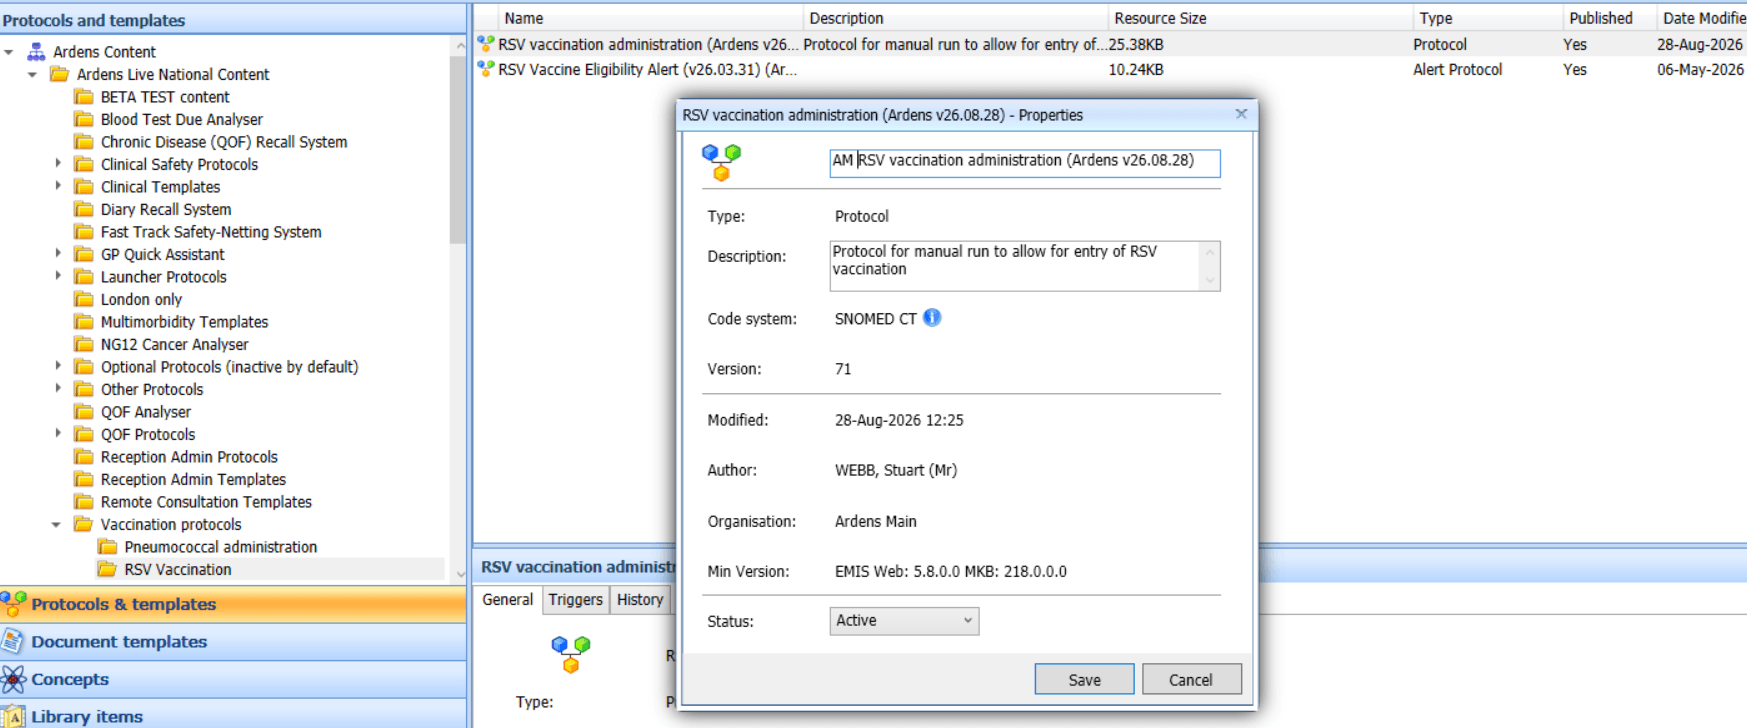
Deactivate the original Ardens Protocol
Once you have created the local copy, deactivate the original Ardens protocol so that practice staff use the locally maintained version.
Select Shared Folders > Ardens Live National Content > Vaccinations protocols > RSV Vaccination
Right-click on the "RSV vaccination administration" protocol and select Status > Deactivate
Edit Local Protocol
Navigate to the local copy of the protocol
Right-click on the protocol and select Protocol > Edit
Use the scroll bar at the bottom of the screen to scroll right until you see the "EDIT BATCH NUMBER/EXPIRY DATE" box
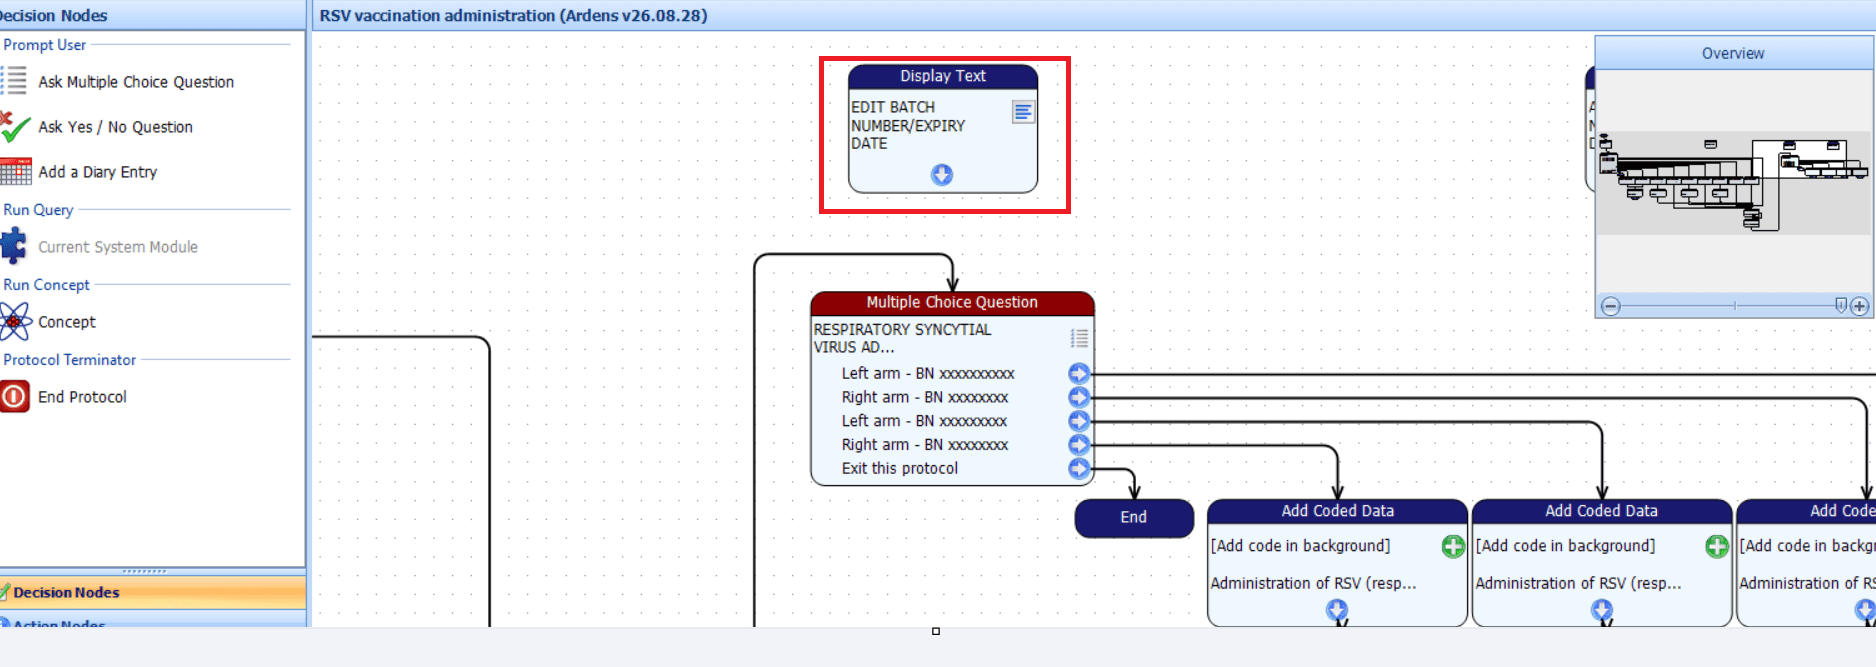
Below the EDIT BATCH NUMBER/EXPIRY DATE box, there is a multiple-choice question box, together with associated Add Coded Data boxes. Double-click on the multiple-choice box.
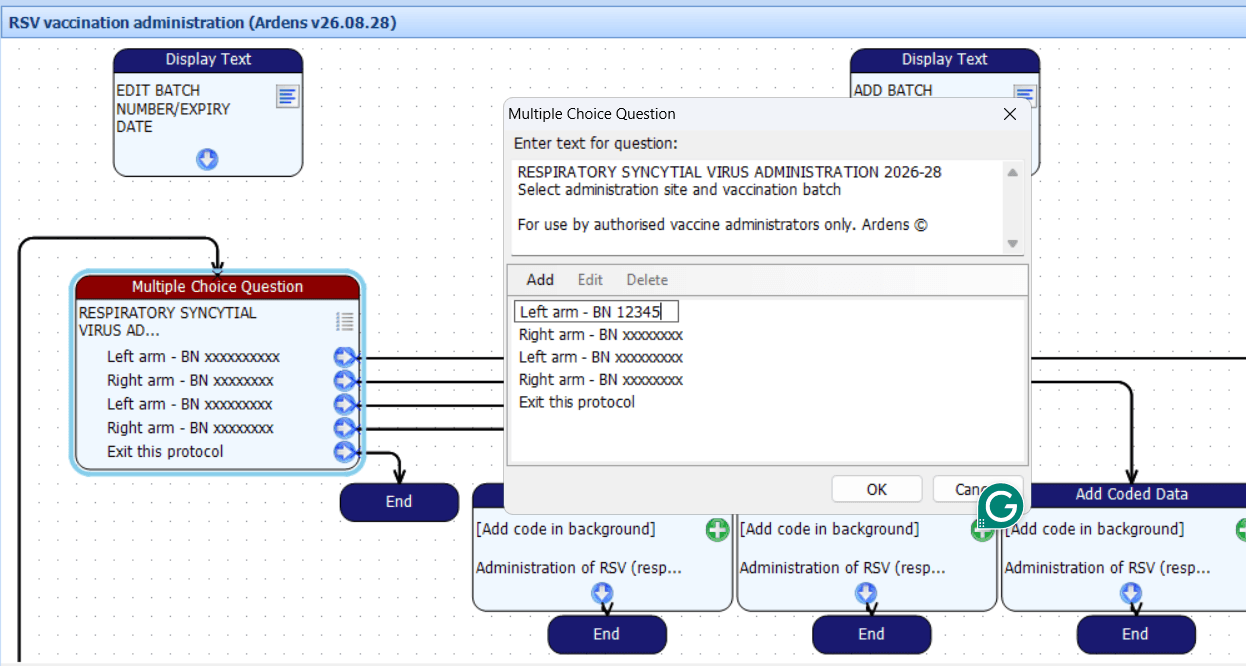
Select the first option and click Edit.
Replace the XX placeholders for the batch number (BN) with the details of your practice's vaccine stock.
Repeat this for each option.
Select OK once complete.
Next, double-click on the associated Add Coded Data box.
Complete the Manufacturer, Expiry Date, Batch Number and GMS fields
Select OK
Repeat this for each Add Coded Data box associated with the multiple-choice box
⚠️Important: The Add Coded Data boxes MUST be completed for the vaccination data to be saved back to the patient record.
Once complete, click Save and Close
Press Yes to any warning messages
Right-click on the protocol, select Status > Activate
⚠️ Please note: When a protocol or template is edited and saved, it may return to Draft. You will need to activate it again before the practice staff can use it.
The protocol will now be available for practice staff to add to their F12 key. Access this support article for details on how to use the resources.
⚠️Please note: One staff member only needs to copy and update the protocol once for the practice. After that, other staff can add the finished local protocol to F12 and use it in clinics.
💉Seasonal Influenza
The Seasonal Influenza protocol needs to be copied into a practice folder and updated with details of the influenza vaccines currently being administered by the practice.
Create a Local Copy
Access the Resource Publisher module
Select Shared Folders
Select Ardens National Content - New > Vaccinations
Right-click on the "Seasonal Vaccinations - Influenza 2026/27" protocol and select Copy
Navigate to an appropriate practice folder
Right-click the folder and select Paste
We recommend renaming the protocol once it has been copied. Right-click on the copied protocol and select Properties
Enter a name for the protocol, for example, by adding your practice initials to the beginning of the title
Select Save
⚠️Please note: once pasted, the protocol may not appear immediately, and you may need to click Refresh on the EMIS ribbon and log out and back in to the system.

Deactivate the original Ardens Protocol
Once you have created the local copy, deactivate the original Ardens protocol so that practice staff use the locally maintained version.
Select Shared Folders > Ardens National Content - New > Vaccinations
Right-click on the "Seasonal Vaccinations - Influenza 2026/27" protocol and select Status > Deactivate
Edit Local Protocol
Navigate to the local copy of the protocol
Right-click on the protocol and select Protocol > Edit
Use the scroll bar at the bottom of the screen to scroll right until you see the "EDIT BATCH NUMBER/EXPIRY DATE" box

Below the EDIT BATCH NUMBER/EXPIRY DATE box, there are multiple-choice question boxes for each vaccine type, together with associated Add Coded Data boxes
Edit each multiple-choice box, depending on the vaccine types you will be using for your practice
Identify the vaccine types that your practice will be using
Double-click the relevant multiple-choice box, for example, LAIV

Select the first option and click Edit
Replace the XX placeholders for the batch number (BN) and expiry date with the details of your practice's vaccine stock

Repeat this for each option
Select OK once complete
Next, double-click on the associated Add Coded Data box
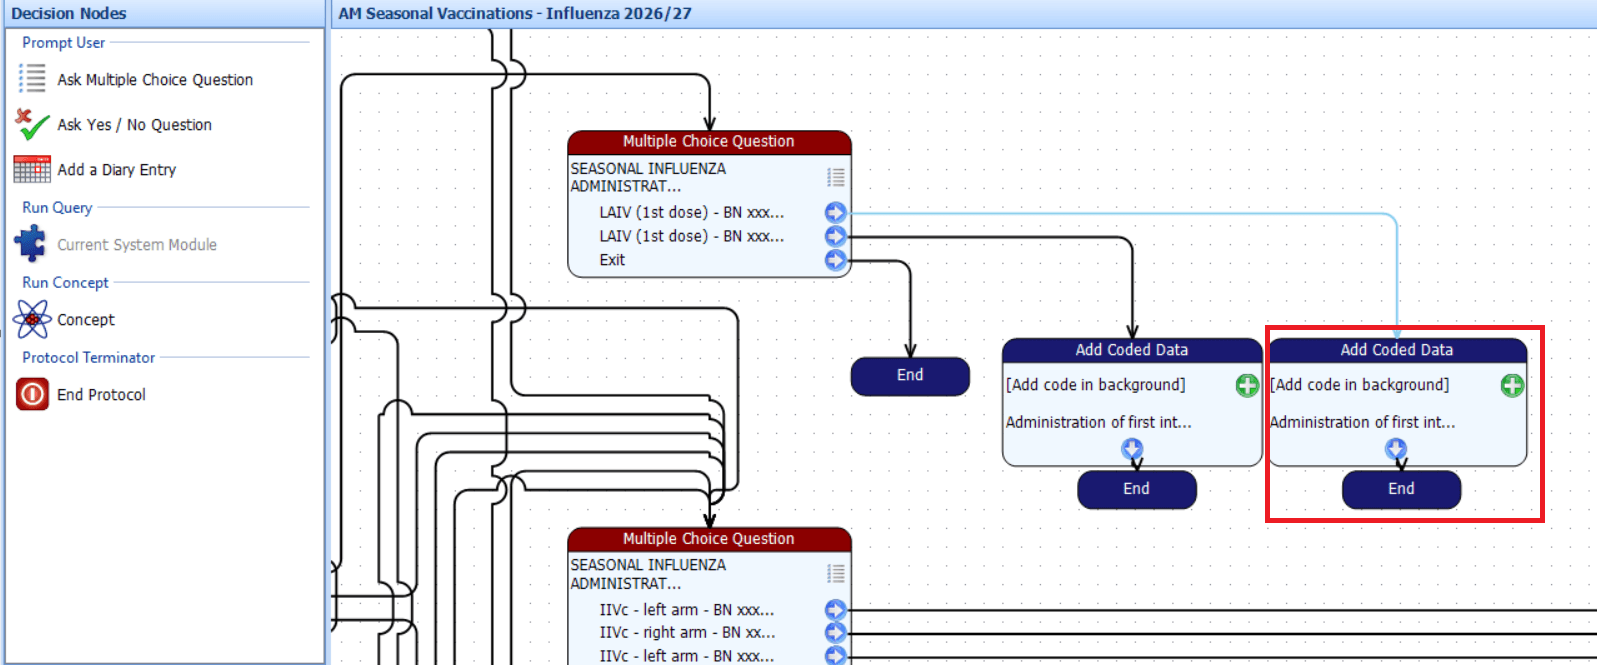
Complete the Manufacturer, Expiry Date, Batch Number and GMS fields
Select OK
Repeat this for each Add Coded Data box associated with the vaccine type
⚠️Important: The Add Coded Data boxes MUST be completed for the vaccination data to be saved back to the patient record.
Repeat the above steps for each vaccine type used by your practice
Once complete, click Save and Close
Press Yes to any warning messages
Right-click on the protocol, select Status > Activate

⚠️Please note: once pasted, the protocol may not appear immediately, and you may need to click Refresh on the EMIS ribbon and log out and back in to the system.
The protocol will now be available for practice staff to add to their F12 key. Access this support article for details on how to use the resources.
⚠️Please note: One staff member only needs to copy and update the protocol once for the practice. After that, other staff can add the finished local protocol to F12 and use it in clinics.
❓FAQ
Why do I need to create a local copy of the protocol?
The Ardens protocol is provided as a resource for practices to use as a starting point. Creating a local copy allows your practice to add and maintain the vaccine details relevant to your current stock.
What vaccine information needs to be added?
The local protocol should contain the details required to identify the vaccine being administered, including the vaccine name, batch number and expiry date.
Why do I need to complete the Add Coded Data boxes as well as the multiple-choice boxes?
The multiple-choice boxes help present the correct vaccine options during use, but the associated Add Coded Data boxes must also be completed for the vaccination details to save back correctly to the patient record.
Why can’t I see the copied protocol straight away?
After copying the protocol, the local version may not appear immediately in EMIS Web. If you cannot see it, refresh the view and then log out and back in again.
Why has my protocol gone back into Draft after I edited it?
When a protocol or template is edited and saved, it may return to Draft. If this happens, you will need to activate it again before practice staff can use it.
Does every member of staff need to copy and edit the protocol themselves?
No. One staff member only needs to copy and update the protocol once for the practice. After that, other staff can add the finished local protocol to F12 and use it in clinics.
What if my practice only uses some of the vaccine types listed in the protocol?
Only update the sections relevant to the vaccine types your practice is actually using. This helps keep the protocol clear and reduces the risk of selecting the wrong stock details during a clinic.
🏫 Additional Support
Book training for your GP Practice, PCN or ICB
Contact our Support Team for support in real time